Love Potion Bottles
Packaging goes a long way. Major brands spend a lot of money creating the perfect packaging for their products and for good reason. In many cases, people will make buying decisions based on the packaging. The concept extends to gifts as well. there’s a reason most people buy wrapping paper, gift bags, and tissue paper instead of presenting a gift wrapped in the plastic bag from the store it was purchased.
Simple DIY gifts are great and, when selected right, show a lot of thought and care. Dress up the packaging and you go from a thoughtful gift to a really impressive treat. No, it’s not necessary, but if you’ve gone through the trouble to make something yourself, isn’t it nice to make it look as nice as the thought behind it?
The little bottles are east to make and are perfect for bath salts and bubble baths. You could even fill them with colored water or glitter as a fun decorative item (especially great for those potion-loving Potter fans in your life). For these I used some bottles I had laying around from Halloween (we had a pretty sweet potions bar and these little guys held the ‘ingredients’ – aka candy). I normally try to avoid crafts with glitter because it ends up everywhere, but this one results in minimal mess so what the heck.
I’m really pleased with how these came out, though I’d like to work on finding a few other fun ingredients to add in with the bath salts to add more variety to how they look in the bottles. I was also hoping to have a bubble bath recipe to go along with that, but hit a snag tracking down one of the ingredients I needed for the recipe. The snag was a tantrum. A huge, toddler sized, radioactive meltdown. I abandoned my quest for ingredients and settled for a coffee on the way home instead. But I’m hoping to pick up what I need soon. Fingers crossed.
DIY Love Potion Bottles
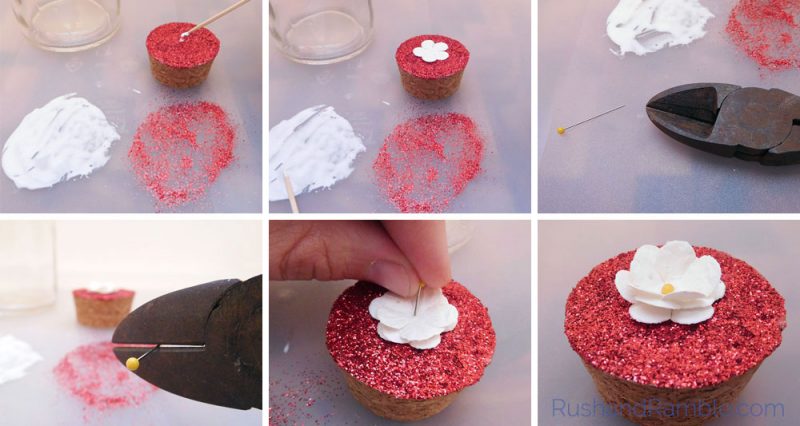
Pour some glue and glitter on a disposable plate or easy-to-clean surface. I’m using a plastic serving tray from IKEA. I picked it up a while back an it’s become my favorite surface for little crafts. Dip the top of the cork in the glue then stamp your work surface a few times to spread it around and remove excess. Dip the glue-covered cork in glitter and set aside to dry.

Repeat this process on any other bottle corks you plan to use while the glue is still wet.

Add embellishments to the top of the cork at this time as well. Here I made a small flower by layering three pre-cut paper flowers with a bit of glue then cutting a straight pin to hold it in place without sticking out the opposite end of the cork.

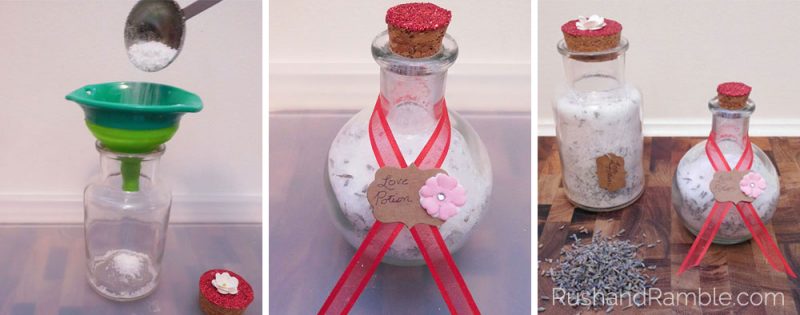
Cut a piece of ribbon to wrap loosely around the neck of the bottle. Use the glue to attach paper jewelry labels. Use glue between every layer – some glue will likely bleed through the ribbon but it will not be enough to hold it together. Add embellishments and writing to the tag and set aside to dry.

Once corks are completely dried, fill the bottles. I used homemade bath salts and a bit of dried lavender. Seal the bottle with your dried corks and ribbons and they’re ready to be gifted.

 |
Materials
|
Instructions
Pour some glue and glitter on a disposable plate or easy-to-clean surface. Dip the top of the cork in the glue then stamp your work surface a few times to spread it around and remove excess. Dip the glue-covered cork in glitter and set aside to dry. Repeat this process on any other bottle corks you plan to use while the glue is still wet. Add embellishments to the top of the cork, if desired, then set aside to dry. Cut a piece of ribbon to wrap loosely around the neck of the bottle. Glue paper jewelry labels – use glue between every layer. Some glue will likely bleed through the ribbon but it will not be enough to hold it together. Add embellishments and writing to the tag and set aside to dry. Once corks are completely dried, fill the bottles. Seal the bottle with your dried corks and ribbons and your potions are ready to be gifted.
